Last updated: 2026-11-02 (Phase 7: the online copy with sign-in, and in-app help)
You can also open this manual from the "?" (Help) button at the top right of NeoVerify. The Japanese version is docs/USER_MANUAL.md.
What NeoVerify does
First: NeoVerify does not decide what is true
NeoVerify helps you judge how far you can trust a web page, an X post, an image or a piece of text, by gathering the evidence quickly. The number it shows is not "the chance that it is true" — it is a Trust indicator. The indicator always comes with a range and its reasons, and when there is not enough to go on, NeoVerify shows "Insufficient evidence" instead of a number.
What you can do
- Paste an article's link and press Enter: the result arrives in about 1–2 minutes (two steps)
- NeoVerify gathers evidence through four lenses
- Provenance: who published it (when the domain was registered, its past record, the author, the age of the X account, and so on)
- Corroboration: whether other, independent sources report the same thing, and whether anyone disputes it
- Manipulation: whether an image has been reused from elsewhere, and whether it carries a record of how it was made (Content Credentials)
- Context: whether the headline matches the text, and whether dates and quotes line up
- For each "checkable claim" in the article (up to 5), it shows Supported / Disputed / Unverified
- It lists the sources it found, so you can open each one and check for yourself
- It keeps your past results and what they cost
- You can copy a result as text, and save your History as a spreadsheet file (CSV)
What it cannot do (important)
- It cannot say for certain whether something is true or false. Read the indicator and its reasons, then decide for yourself
- It does not judge the people who posted or publish the information. It evaluates the information, not the person
- It cannot check video or audio (images and text only)
- It does not support social networks other than X (Facebook, Instagram, Threads and others)
- "Is this image made by AI?" is a reference value only. It never moves the indicator much on its own
Where it runs
NeoVerify can be used in two ways.
| Mac copy | Online copy | |
|---|---|---|
| How to open it | In this Mac's browser: http://localhost:3000 | Also from an iPhone or another computer: https://ok.96neko.com |
| Sign-in | None (only this Mac can open it) | Password required |
| Results, History and spending | In the data folder on this Mac |
On the server (separate from the Mac copy) |
| Instructions | This chapter and "Getting started" | The chapter "Using the online copy (ok.96neko.com)" |
- The Mac copy opens only in this Mac's browser (other devices on the same Wi-Fi cannot open it)
- Browser: the latest Safari / Chrome / Edge (Safari on iPhone)
- The Mac copy keeps results and History only on this Mac (the
datafolder inside the NeoVerify folder)
Getting started (start and stop)
Start
Open the "Terminal" app (Launchpad → "Other" → "Terminal")
Paste this line and press Return
cd ~/Projects/NeoVerify && npm run devWhen "Ready" appears, open http://localhost:3000 in your browser (if another app already uses port 3000, open the address with the number shown in Terminal)
Stop
- Click the Terminal window, then press Control + C
- Closing Terminal also stops it. Your results and History are kept
Reading the Report
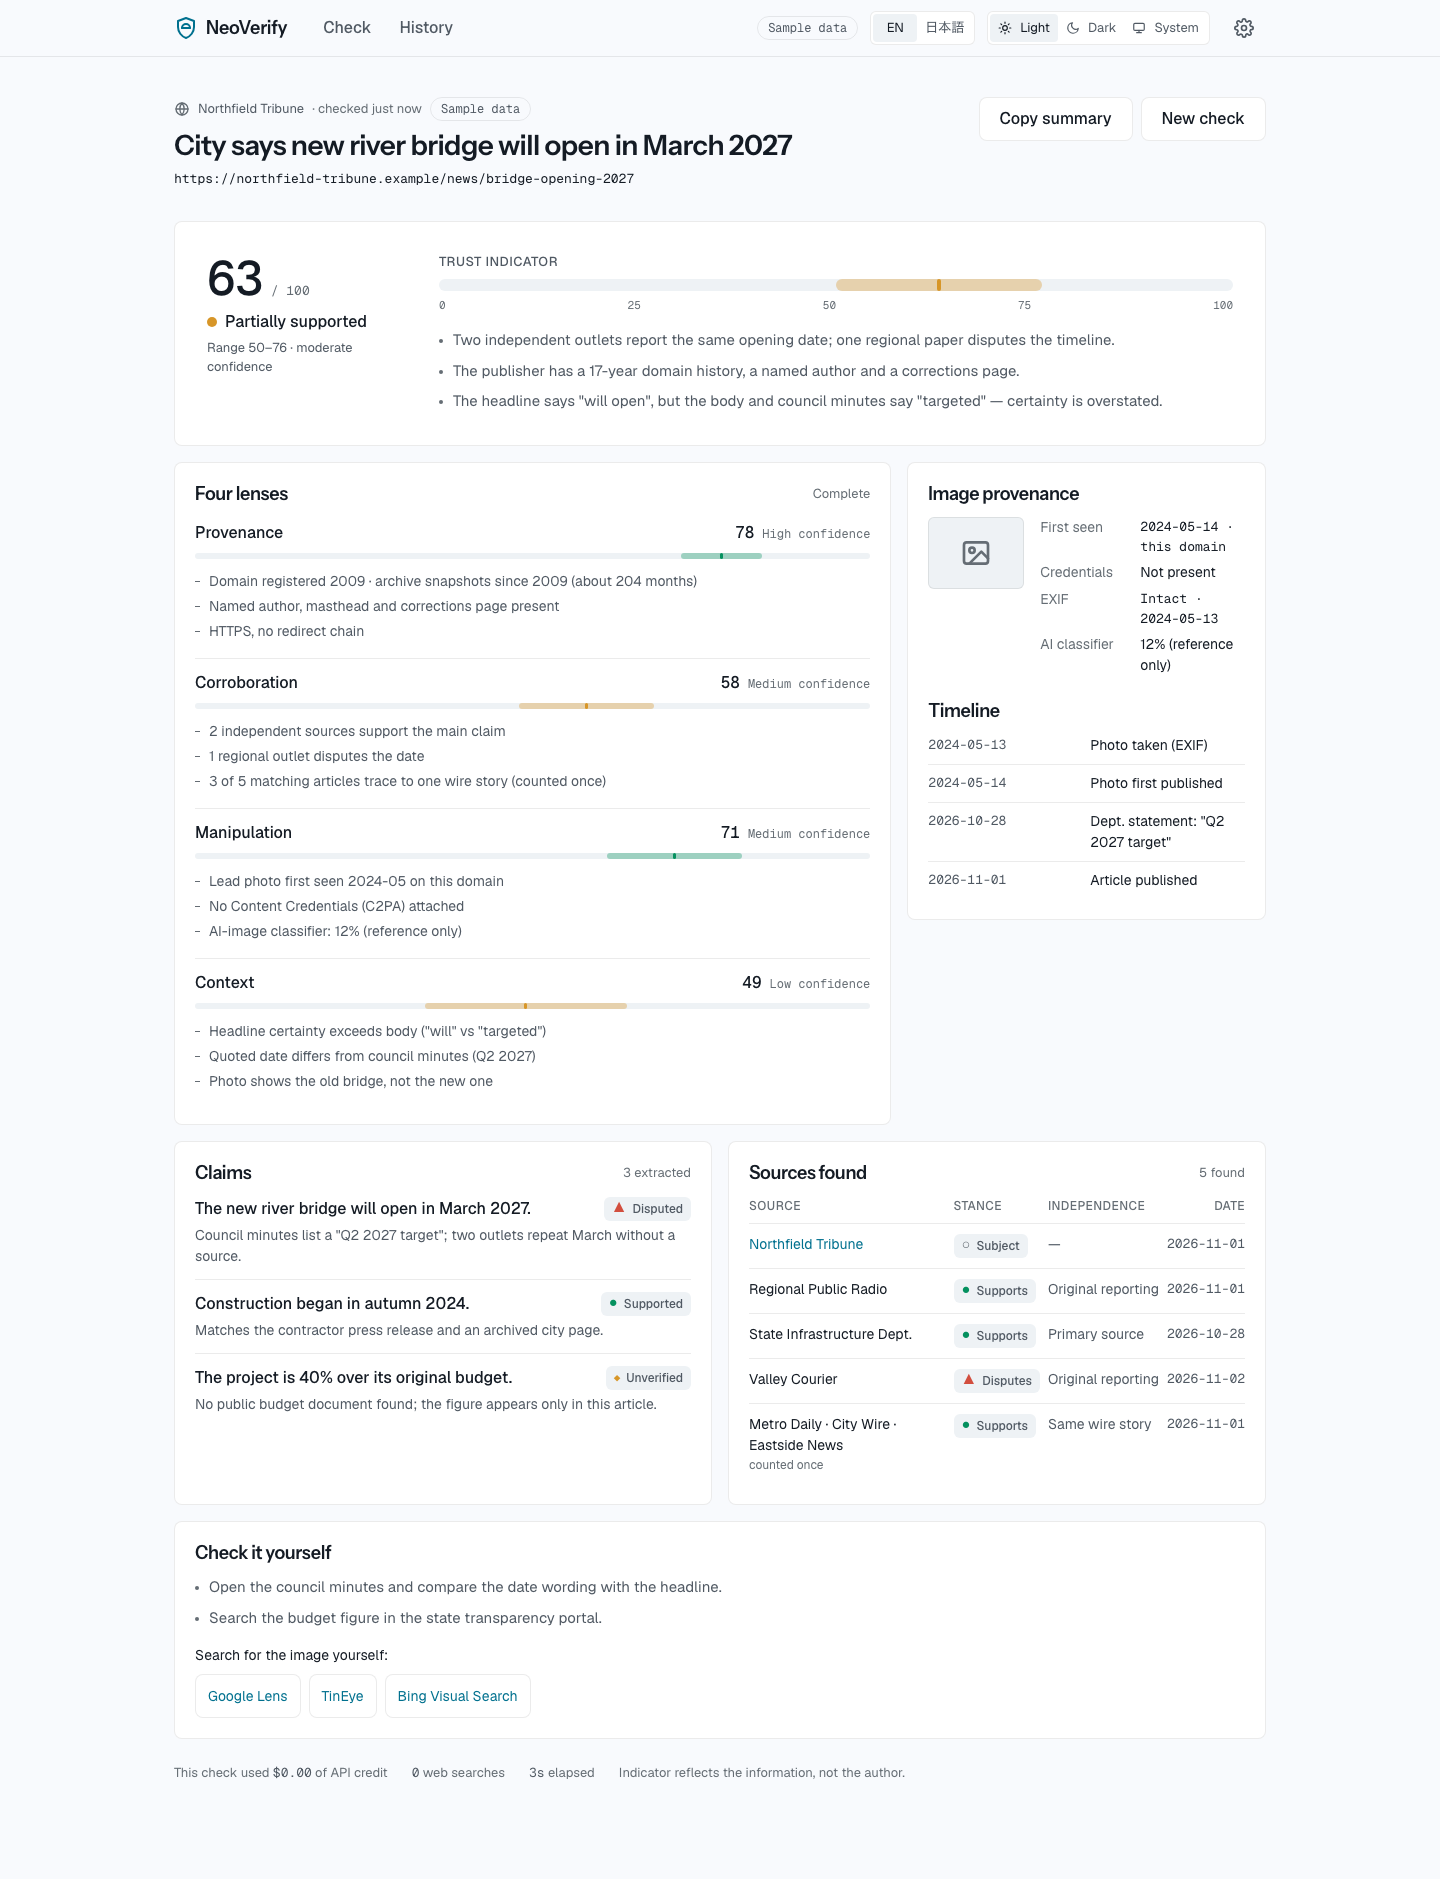
1. Trust indicator
The large number card at the top of the screen.
Number (0–100): the four lenses' scores combined. Higher means more evidence and fewer contradictions
Label: the words for the number
Number Label 0–20 Unreliable 21–40 Questionable 41–60 Mixed 61–80 Partially supported 81–100 Well supported Range (for example "range 50–76"): how far the indicator might be off. The less evidence there is, and the less certain a lens is, the wider the range. A range of 16 or less shows "High confidence", 26 or less "Medium confidence", and anything wider "Low confidence"
Range bar: on a 0–100 scale, the range is the band and the indicator is the vertical line. Colors: red for 0–39, yellow for 40–69, green for 70–100. Don't judge by color alone — always read the label too
Why this score (3 lines): the reasons for the indicator. Read these before the number
While a check runs, the band starts across the whole 0–100 scale and narrows each time a lens finishes
2. When you see "Insufficient evidence"

When there is not enough evidence, NeoVerify deliberately shows no number and gives the reason in one line. The usual reasons:
- No checkable claim (who, when, what) was found — for example opinion or poetry
- Fewer than three lenses could be checked (checks of pasted text only or of an image only always end here, because provenance or corroboration cannot be checked)
- The check was cancelled or stopped
"Insufficient evidence" does not mean "false". It means "there is nothing to judge it by yet".
3. The four lenses
Each lens shows a score (0–100), its confidence (High / Medium / Low) and 2–3 lines of reasons. A lens without evidence shows "Insufficient evidence" and the reason instead of a score.
4. Claims
The checkable claims taken from the article, and how each one fared.
- Supported (●): independent sources support it
- Disputed (▲): some sources contradict it
- Unverified (◆): neither support nor contradiction was found
5. Sources found
For each source NeoVerify shows its stance (Supports / Disputes / No mention / Subject = the article being checked), its independence and its date. Select a name to open the original page in a new tab.
- Primary source: issued by someone directly involved, such as a public agency's announcement
- Original reporting: the outlet reported it itself
- Same wire story: several outlets ran the same news-agency story. However many outlets ran it, it counts once (so the count is not inflated)
- Crowd-sourced: written by users, such as X Community Notes
6. Image provenance
What was found about the article's main image, or about an image you dropped.
- First seen: when and where the image first appeared online (as far as could be found; "estimate" when it was estimated)
- Credentials (C2PA): whether the image carries a record of how it was taken or edited. Only some cameras and AI tools add one, so "Not present" does not by itself mean anything is wrong
- EXIF: the capture date and camera, read from the original image. If it contains a location (GPS), the coordinates are never saved (only "it had one" is recorded)
- How image locations are handled: JPEG / PNG / WebP images are saved after removing location and camera information (metadata). When an image is sent to an outside service to be checked (Claude, TinEye, Hive), the cleaned copy is sent. HEIC (the iPhone's standard format) cannot be cleaned, so its location may stay in the saved and sent copy (the progress log says so too). For photos whose location you don't want to share — your home, for example — export them as JPEG from the Photos app first
- AI classifier: a reference value for whether the image was made with AI. Without a classifier set up it shows "Not run"
7. Check it yourself
One to three concrete steps for checking it yourself. When there is an image, links to search for it on Google Lens, TinEye and Bing appear too.
8. The X post card
Only for X posts, an "X post" card appears near the top of the Report.
- Posted (with "edited" if it was edited), reactions (likes, reposts, replies, quotes) and views
- Account: when it was created (how many days or years ago), followers and following, the number of posts and posts per day, the kind of verification (none / paid / organization / government), and whether the profile has a link
- Name: shown when the name contains words such as "Breaking", "Official" or "News" without organization verification
- Quoted / replied to: for a quote or a reply, the original post
- Other posts: how many other posts reported the same topic within a day of it (and how many of those come from organization-verified accounts). Posts older than 7 days show "not searched", because X's search does not reach that far back
- Pressure language: shown when alarming wording was found
- Community Notes: X's official API cannot read them, so it says they couldn't be checked
- X API: what reading this post cost on X (an estimate, billed by X)
The card does not judge the person. The account's record is one piece of evidence about where the information comes from.
9. The bottom of the screen
What this check cost in Claude API credit, how many web searches it made, and how long it took. For X posts, the X API cost (an estimate) is shown separately. "What this number means" at the end opens this chapter of the manual.
Basic use
Check a web page
- Paste the article's link into the box on the Check screen (the box is already selected when the screen opens, so you can paste right away)
- Press Enter. The Report opens at once and the progress is described as it happens
If you have checked the same link before, the earlier result opens right away. To check it again, press "Re-check" (it costs again). A Report is written in the language that was on screen when the check started; if you switch the language and paste the same link again, NeoVerify checks it anew in that language.
Check an X post
- Paste the post's link (
https://x.com/account/status/number) and press Enter - Besides the post's text, images and time, NeoVerify reads the account's creation date, followers and number of posts, and the reactions
- X Community Notes cannot be read through X's official API, so NeoVerify says it couldn't check them through the X API
- Without an X API token set up, NeoVerify explains how to set one up and the cost (about $0.005 per post), and carries on with what it can read as a web page
Check an image
- Drag and drop an image file onto the Check screen, paste a copied image, or press "Choose an image"
- JPEG / PNG / WebP / HEIC, up to 20 MB each
- JPEG / PNG / WebP are saved and sent after removing location and similar information. HEIC may keep its location (see "Image provenance" above)
- An image alone cannot be corroborated or put in context, so NeoVerify shows no number, only the image provenance
Check text
- Press "Paste article text", paste 200 characters or more, then press "Check" (⌘ + Enter also starts it)
- Pasting long text into the link box switches to text automatically
- The source is unknown, so NeoVerify shows no number, only the claims and their corroboration
- For text over 50,000 characters, only the first 50,000 are checked, and the Report keeps saying so
Copy the result (Copy summary)
- "Copy summary" on the Report copies the indicator, range, label, the 3 lines of reasons, the four lenses, the claims and the list of sources as text
- The button says "Copied" for about 1.2 seconds when it's done. Paste it into a note or a message
- It is written in the screen's language (English / Japanese) and ends with when it was made and "Indicator reflects the information, not the author."
- It can't be used while the check runs (so a partial result never looks finished)
Try a sample
You can try NeoVerify with sample data before setting up any keys (it costs nothing).
- Add
NV_MOCK=1to.env.localin the NeoVerify folder, then start it - Under "Try a sample:" on the Check screen, press "News article" or "X post"
- Sample results always say "Sample data". They are not real results
(pasting a link that starts with
riverside-notes.opinion.exampleshows the "Insufficient evidence" sample)
History and spending
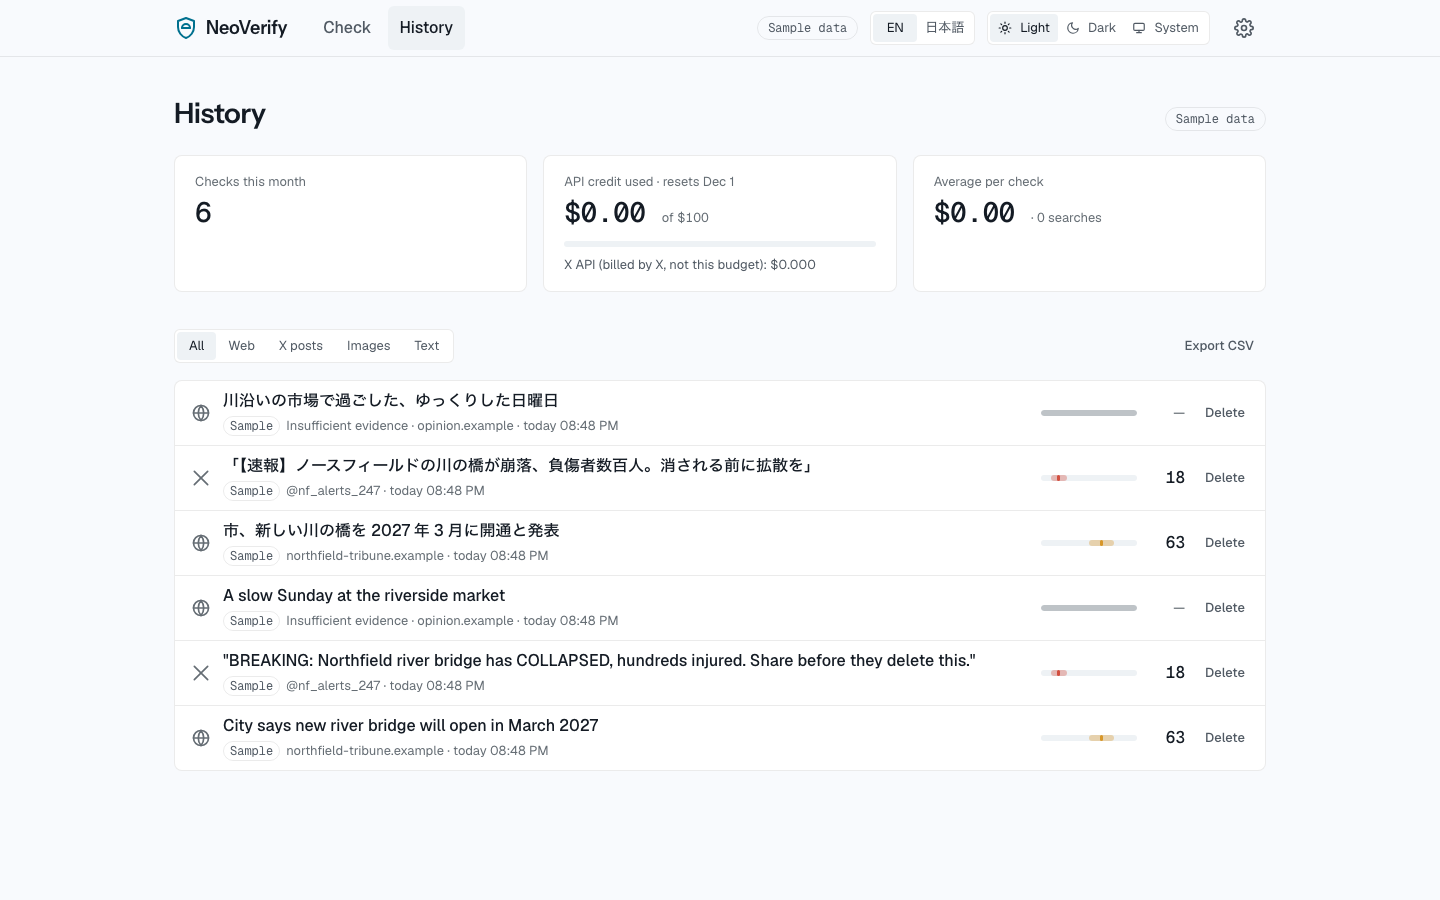
Reading History
- The History screen lists your checks, newest first. Select a row to open its Report
- Filter with "All / Web / X posts / Images / Text"
- "Delete" asks first. A deleted check cannot be brought back. What the check cost still counts toward this period's spending
Reading the spending
- API credit used: what you have spent on Claude this period (from the credit renewal day to the day before the next one), and its share of the monthly budget
- Average per check: the average cost of one check. Expect about $0.65–0.70 per check (measured: an average of $0.65 over 5 checks)
- X is billed separately: reading X posts is billed by X, not from your Claude credit. The screen shows it apart as "X API (billed by X, not this budget)" and leaves it out of the budget warning. The X amounts NeoVerify shows are estimates it calculates. See the actual charges in the X Developer Console
- Credit renewal day: the day your Claude credit resets each month. Set it in Settings (the day shown in the Console — the 14th of each month as of 2026-11)
Budget warning
- At 80% of the monthly budget (100 dollars to begin with), NeoVerify asks before starting a new check. Choose "Check anyway" or "Cancel"
- At 100%, a check starts only after you press "Continue anyway" on the confirmation
- Change the budget and the warning level at any time in Settings
Save History for a spreadsheet (Export CSV)
- "Export CSV" on the History screen downloads every check as one file (
neoverify-checks-date.csv) — all of them, whatever the filter - Excel and Numbers open it directly (Japanese text included)
- Columns: id, kind (web / x / text / image), status, title, source (publisher), url, score (indicator), range_lo / range_hi (range), label, cost_usd (Claude), x_cost_usd (X, estimate), searches (web searches), started_at / finished_at (start / finish, UTC), locale (language), sample (1 for sample data)
- Kinds and labels stay as short English codes (for example
partially= Partially supported), so they are easy to filter - For safety, text starting with
=+-@gets a'in front (so a spreadsheet does not run it as a formula). For example@accountbecomes'@account
Settings
Open it from the gear at the top right. Changes apply right away.
- Language: English / 日本語. At first it follows the browser's language. "EN / JA" at the top right switches it too. A Report's text (reasons, claims and so on) is written in the language used when the check ran (switching later does not change past Reports)
- Appearance: Light / Dark / System (follows the Mac's setting). Your choice is kept for next time
- Monthly budget: how much Claude credit (in dollars) you plan to use per month
- Warn at: at what percentage of the budget to ask first (50–100)
- Credit renews on: the day your Claude credit resets each month (1–28)
- Corroboration search: "Thorough (Claude Opus 5.5)" is the default. Choose "Balanced (Claude Sonnet 5.5)" to spend less (it may find fewer sources)
- Sign-in: "On" (a password is required — the online copy) or "Local only" (no password — the Mac copy)
- API keys: only whether each key is "Configured" or "Not configured". The keys themselves never appear on screen
- User manual: "Open the user manual" at the bottom opens this manual (so does "?" at the top right)
Setting up keys (API keys)
NeoVerify uses a Claude API key for real checks, and an X Bearer Token to read X posts. Keys are valuable and must never go online, so they live only in a file on this Mac.
How to set them up
In the NeoVerify folder (
~/Projects/NeoVerify), create a file named.env.local(or open it if it exists)..env.exampleis there as a template: copy it and rename the copyWrite these two lines. After each
=, paste the key with no spacesANTHROPIC_API_KEY=your Claude API key here X_BEARER_TOKEN=your X Bearer Token hereSave, then stop NeoVerify and start it again (Control + C →
npm run dev)When Settings → "API keys" shows "Configured", you're done
- Create a Claude API key under "API Keys" at https://console.anthropic.com
- Find the X Bearer Token under your app's "Keys and tokens" in the X Developer Console
- Keys for the image search (TinEye) and the AI classifier (Hive) are optional. NeoVerify works without them
- Never paste keys into a chat or an email.
.env.localis set up never to be sent to GitHub
When a key was replaced or stops working
- "The Claude API key was rejected" or "The X Bearer Token was rejected" on screen means the key has expired or was pasted wrongly
- Create a new key in the Console, replace what follows
=on that line of.env.local, save, and restart NeoVerify - Deleting (revoking) the old key in the Console is safer
Using the online copy (ok.96neko.com)
The online copy is NeoVerify running on a server on the internet (ConoHa). It works from an iPhone or anywhere else, even with the Mac closed. It looks and works like the Mac copy. The differences: it has sign-in, and it keeps its own records.
Sign in
- Open https://ok.96neko.com in a browser. The sign-in screen appears
- Type the password and press Enter ("Show password" lets you check what you typed)
- When the Check screen appears, you're in. This browser stays signed in for 30 days (extended automatically while you use it)
- Save the password in the iPhone's Passwords app (or similar) and it fills in next time
- "How to use NeoVerify" under the sign-in form opens this manual before you sign in
Sign out
- Press the button at the top right shaped like an arrow leaving a door (its spoken name is "Sign out"). You return to the sign-in screen
- Always sign out after using a shared computer
When sign-in is paused after wrong passwords
- Five wrong passwords in a row pause sign-in for 15 minutes (even the right password is refused). The screen shows how many minutes remain; wait until then
- The pause applies to everyone, not just the device that made the mistakes (if someone else gets it wrong five times, you also wait 15 minutes). This stops anyone from guessing the password
- One correct sign-in sets the count of mistakes back to zero
When you forget the password, or want to change it
The server keeps the password only in a form that cannot be turned back (a hash), so it cannot be looked up. You choose a new one instead. This is done on the server; if you're not used to it, ask the assistant (AI) "change the online copy's password". To do it yourself:
- In the Mac's Terminal, connect to the server:
ssh -i ~/.ssh/conoha_neochat ubuntu@<server address> - Run
cd ~/neoverify && npm run set-passwordand type the new password (12 characters or more) twice (nothing shows as you type) - A line starting with
NV_AUTH_PASSWORD_HASH=scrypt\$…appears. Copy the line exactly (keep every\of\$) - Open the file with
nano .env.production.local, replace the line starting withNV_AUTH_PASSWORD_HASH=with the copied line, and save (Control + O → Enter → Control + X) - Restart NeoVerify with
pm2 reload neoverify --update-env. When the new password signs you in, you're done
- Browsers that are already signed in stay signed in after a password change. To sign out every browser, also replace what follows
NV_SESSION_SECRET=in the same file with a new string made byopenssl rand -base64 48, then restart
Update the online copy
After a new version is on GitHub, run this one line on the server (or ask the assistant):
cd ~/neoverify && bash deploy/deploy.sh
It's done when it ends with "OK". For a minute or two during the update, pages may look broken or not load.
The full steps are in deploy/README.md.
How it differs from the Mac copy
- Records are separate. The online copy's History, spending and settings (such as the budget) are not shared with the Mac copy. Checks made on the Mac do not appear in the online History
- Watch the total spending. If both use the same Claude API key, they share the same Claude credit. But each copy's "API credit used" and budget warning count only what that copy spent. In a month when you use both, check the total in the Claude Console
- The online copy also removes location and similar information from images before saving them on the server (as on the Mac; HEIC may not be cleaned — see "Image provenance")
- Try a sample (
NV_MOCK=1) is for the Mac copy only
Frequently asked questions
Q: It says "Insufficient evidence". Is it broken?
- A: No. There is not enough to judge by, so NeoVerify deliberately shows no number. Read the one-line reason. Articles without checkable claims (opinion, poetry), checks of text only or of an image only, and checks that stopped partway end like this. It does not mean "false"
Q: It says "This check could not be completed" and the page can't be fetched
- A: The site wants you to sign in or subscribe ("blocked by the site"), the page doesn't exist, or it didn't answer within 20 seconds, among others. The cause is shown in one line; "Paste the text and retry" below it lets you paste the article's text and check that instead (the original link is kept for reference)
Q: An X post can't be read
- A: One of these: ① Settings shows the X Bearer Token as "Not configured" (set the key and restart), ② the post was deleted or is from a protected account, ③ X's usage limit was reached (wait about 15 minutes, then "Re-check"), ④ your X balance is empty (add credit in the X Developer Console). The cause is shown on screen in every case
Q: Checks cost more than I expected
- A: About 90% of a check's cost is the corroboration web search. Set Settings → "Corroboration search" to Balanced to spend less (it may find fewer sources). X posts also cost X's own fee (an estimate of about $0.15). The same link opens its earlier result right away, so press "Re-check" only when you need a fresh check
Q: The image's "First seen" can't be found
- A: Automatic search only reaches so far. Without a TinEye key, it is estimated from a description of the image. Search yourself from the Google Lens / TinEye / Bing links under "Check it yourself" (for a dropped image, upload the image file on the site that opens)
Q: I closed the page while a check was running
- A: The check carries on on the computer running NeoVerify. Open it from History to see the result. If NeoVerify was stopped, the check shows as "Incomplete"; "Re-check" runs it again from the start
Q: "Part of this check could not be completed" appears above the result
- A: Part of the analysis failed. Below it, the cause and what to do are shown in one line (for example "Claude's rate limit was reached. Wait a minute, then run Re-check."). The other lenses' results are still there. History shows the check as "Incomplete"
Q: What happens when I press "Cancel"?
- A: NeoVerify stops, keeping the lenses that had finished, and History shows "Incomplete". To finish it, press "Re-check" (it starts over and costs again)
When something goes wrong (troubleshooting)
- Problem: http://localhost:3000 won't open in the browser
- Fix: check in Terminal that NeoVerify is running ("Ready" shows). If it stopped, start it with
cd ~/Projects/NeoVerify && npm run dev. If another number is shown, open the address with that number
- Fix: check in Terminal that NeoVerify is running ("Ready" shows). If it stopped, start it with
- Problem:
npm run devstops with an "another instance" or "lock" error- Fix: NeoVerify is already running elsewhere (only one can run per folder). Open the address of the one that is running (for example http://localhost:3090), or stop it and start again
- Problem: "Claude's rate limit was reached"
- Fix: wait about a minute, then press "Re-check"
- Problem: "The Claude API returned an error"
- Fix: check your credit balance in the Claude Console, then press "Re-check"
- Problem: "Your Claude API credit has run out"
- Fix: add credit under Plans & Billing in the Claude Console, then press "Re-check"
- Problem: "One part of the analysis returned an answer that couldn't be read…"
- Fix: this is usually temporary; press "Re-check"
- Problem: "This request used an address NeoVerify doesn't answer to…"
- Fix: check that the browser's address bar shows
http://localhost:number. NeoVerify can't be opened under any other name or from other devices
- Fix: check that the browser's address bar shows
- Problem: on the online copy, "That password isn't right"
- Fix: check for typos and Caps Lock. On an iPhone, also check that the first letter wasn't capitalized automatically. The message shows how many tries are left before the pause
- Problem: on the online copy, "Too many wrong passwords in a row, so sign-in is paused"
- Fix: wait for the minutes shown (15 at most), then sign in again. If you forgot the password, see "When you forget the password" in "Using the online copy"
- Problem: on the online copy, "You're signed out"
- Fix: the 30-day sign-in ran out, or you signed out. Reload the page and sign in again
- Problem: the budget confirmation appears every time
- Fix: you have used 80% or more of this period's budget. Raise the budget or the warning level in Settings
- Problem: "Copy summary" says "Couldn't copy"
- Fix: the browser is blocking access to the clipboard. Allow it for this page, or select the text on screen and copy it
Notes
- NeoVerify shows an indicator. It does not guarantee facts. Before an important decision, always check the original sources yourself
- NeoVerify evaluates information. It does not evaluate the people who post or publish it
- A result reflects the evidence found when the check ran. As more information appears, the indicator may change
- "Not reported elsewhere" does not mean "false"
- If you ever publish or share a result, always say that it is an indicator and does not decide truth (copying a result adds a sentence saying so at the end)
Changelog
- v0.1.0 (2026-11-02): first version. Checks of web pages, X posts, images and text; History and spending; Settings; Copy summary; Export CSV
- 2026-11-02 (quality review fixes): image locations removed before saving and sending (except HEIC), opens only on this Mac, the cause and what to do when part of a check fails, the not-found and error screens in Japanese and dark mode, a switched language checks the same link anew in that language, and more
- 2026-11-02 (Phase 7): the online copy (ok.96neko.com) with sign-in (a password, 30 days, a 15-minute pause after five wrong passwords), Sign out, the sign-in state in Settings, in-app help ("?" at the top right, "How to use NeoVerify" on the sign-in screen, "What this number means" on the Report), and this English manual